
 Entersoft - Analysis and Systems Development
Copyright © Entersoft - Analysis and Systems Development - All rights reserved
Entersoft - Analysis and Systems Development
Copyright © Entersoft - Analysis and Systems Development - All rights reserved
 Configurations for using Entersoft OuroCash™ in the network
“... Blessed the people whose God is LORD!” - Psalms 144:15
Like our page on Facebook...
Configurations for using Entersoft OuroCash™ in the network
“... Blessed the people whose God is LORD!” - Psalms 144:15
Like our page on Facebook...

 If you have any questions, feel free to contact us.
We are at your disposal.
Regards,
Development team
Instruction # 4
Installing the Entersoft Runtime™ package
If you have any questions, feel free to contact us.
We are at your disposal.
Regards,
Development team
Instruction # 4
Installing the Entersoft Runtime™ package

 In order for Entersoft OuroCash™ to be used on the terminals of your network, you must install a
runtime package on all computers on your network, except the "SERVER", since it has already been
correctly configured during the software installation.
1.
Download the runtime package at http://www.entersofti.com.br/ourocash/runtime
2.
If you need to configure multiple network terminals, copy this installer to a pen drive or external hard
drive.
3.
Install the runtime package on all the terminals of your network, except in the "SERVER".
Instruction # 5
Creating the system icon on the Desktop
In order for Entersoft OuroCash™ to be used on the terminals of your network, you must install a
runtime package on all computers on your network, except the "SERVER", since it has already been
correctly configured during the software installation.
1.
Download the runtime package at http://www.entersofti.com.br/ourocash/runtime
2.
If you need to configure multiple network terminals, copy this installer to a pen drive or external hard
drive.
3.
Install the runtime package on all the terminals of your network, except in the "SERVER".
Instruction # 5
Creating the system icon on the Desktop

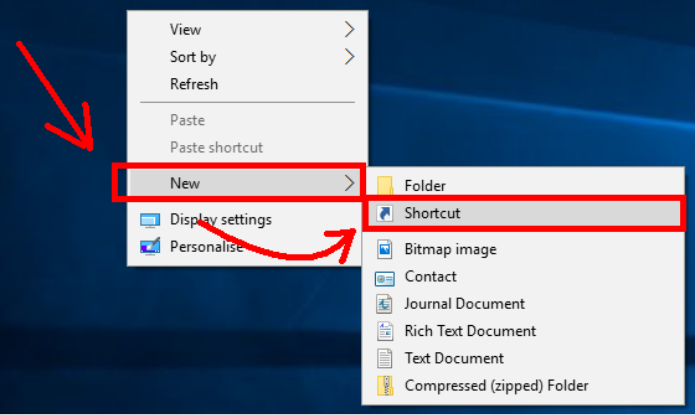
 After installing the runtime package, simply create an icon on the desktop of each network terminal,
to run the system.
1.
On the desktop, click the right mouse button in an empty area, select the "New" option, and select
the "Shortcut" option.
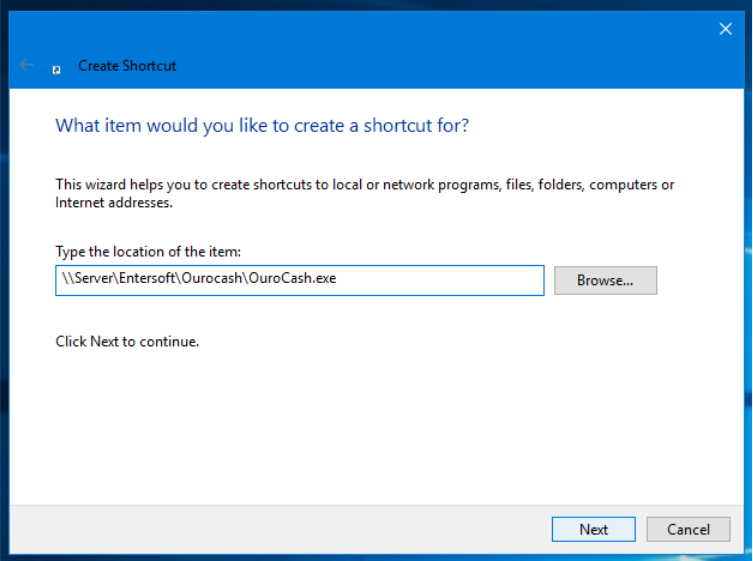
2.
On the next screen, you should tell the path to the system executable there on the "SERVER"
computer.
Type as an example ..:
\\ServerName\Entersoft\OuroCash\OuroCash.exe
Remember to substitute ServerName for the name of your computer "SERVER", in accordance
with the guidelines of Instruction # 1 of this tutorial.
3.
Click the “Next” button.
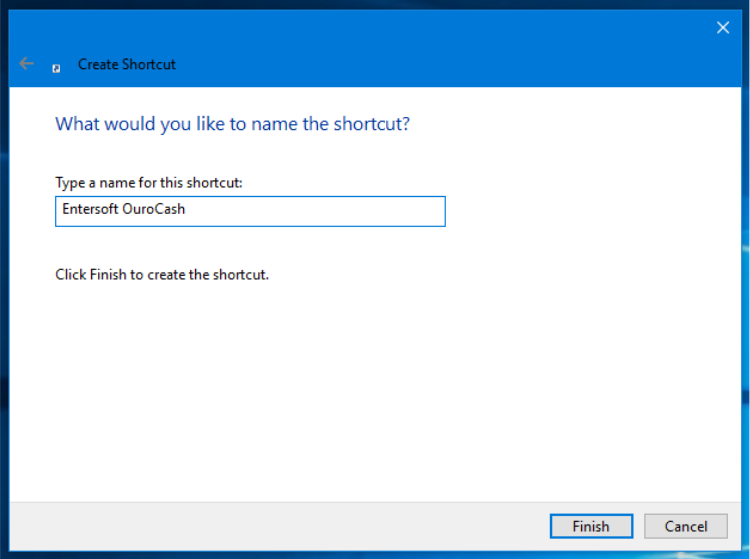
4.
On the next screen, type the shortcut name: "Entersoft OuroCash" and click the "Finish" button.
5.
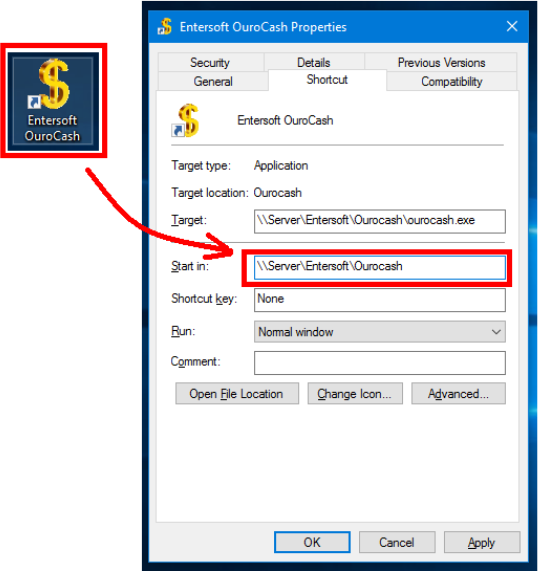
After the icon is created, it is necessary to define a folder where the system will start.
Right-click the icon, then click "Properties".
6.
On the screen that appears, click the "Start In" text box and fill in the server path, as shown below:
\\ServerName\Entersoft\OuroCash
Remember to substitute ServerName for the name of your computer "SERVER", in accordance
with the guidelines of Instruction # 1 of this tutorial.
7.
Finally, click the "Apply" button and "OK" ... and the system is ready for use.
<< Previous Page
After installing the runtime package, simply create an icon on the desktop of each network terminal,
to run the system.
1.
On the desktop, click the right mouse button in an empty area, select the "New" option, and select
the "Shortcut" option.
2.
On the next screen, you should tell the path to the system executable there on the "SERVER"
computer.
Type as an example ..:
\\ServerName\Entersoft\OuroCash\OuroCash.exe
Remember to substitute ServerName for the name of your computer "SERVER", in accordance
with the guidelines of Instruction # 1 of this tutorial.
3.
Click the “Next” button.
4.
On the next screen, type the shortcut name: "Entersoft OuroCash" and click the "Finish" button.
5.
After the icon is created, it is necessary to define a folder where the system will start.
Right-click the icon, then click "Properties".
6.
On the screen that appears, click the "Start In" text box and fill in the server path, as shown below:
\\ServerName\Entersoft\OuroCash
Remember to substitute ServerName for the name of your computer "SERVER", in accordance
with the guidelines of Instruction # 1 of this tutorial.
7.
Finally, click the "Apply" button and "OK" ... and the system is ready for use.
<< Previous Page


 Copyright © Entersoft - Analysis and Systems Development - All rights reserved